Download Green Screen by Do Ink documentation and Drawing Editor documentation in PDF format.
What is Green Screen by Do Ink?
You know what a "green screen" effect is, right? It's used in the movies to make it look like the actors have landed on an alien planet, and it's used on TV to make it look like your local news announcer is standing in front of an animated weather map. Green Screen by Do Ink makes it easy to create green screen videos using your iPad. It emphasizes ease-of-use and simplicity while still enabling you to achieve excellent results.
How the Green Screen Effect Works
The green screen effect works by combining images from two sources into a single image. The two source images are stacked in layers, one in front of the other. Normally, you'd only be able to see the image in front, since it would block your view of the background image. The trick is to make portions of the foreground image transparent, allowing the corresponding parts of the background image to show through. The green screen effect does that by looking for a specific color (like green, for example!) in the foreground image and then erasing any portions of the image that contain that color. The process looks like this:
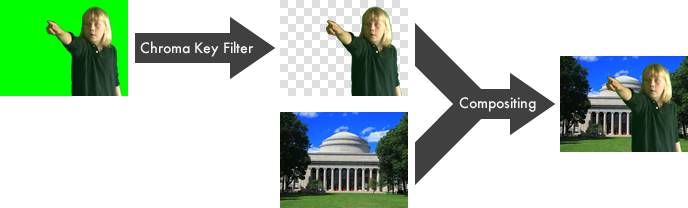
There are two steps in the process of combining the images. First, the foreground image is run through a chroma key filter. This filter looks for portions of the image that contain the chroma key color – green in this example – and makes those areas of the image transparent. The second step combines the two images, letting the background image show through the transparent regions of the filtered foreground image. This is called compositing the images.
Using Green Screen by Do Ink
The basic green screen effect works by combining images from two sources into a single image, using the chroma key filter to create transparent regions in the foreground image and then compositing the result with the background image. Green Screen by Do Ink extends that basic effect in a couple of ways – first, by letting you combine up to three image sources at a time, and second, by letting you create lists of image sources (videos and photos from your camera roll) and then showing them sequentially.
The Gallery
The Gallery is where you’ll find all of your saved projects. You’ll see a thumbnail icon for each project, along with (optional) tags and a title. Tap on a project to open it in the editor.
Tap the  button in the upper right corner of the screen to create a new project and open it in the editor, or to import a project from another location.
Tap the  button in the upper left corner to configure default settings for the app, including the preferred video resolution, camera position, video file format, and image duration on the timeline. These settings are discussed in more detail below.
Tap the  button on a project's thumbnail to show a menu that lets you delete, duplicate, or export the project. (You can also show the menu by swiping left on the thumbnail.)
See the Exporting and Importing Projects section below for more information about exporting and importing projects.
The Sample Project
We’ve created a sample project to help you get started. This project will always be the last project shown in the Gallery. Note that you can edit the sample project to see how the various tools work, but any changes you make to it will not be saved. To create a new project that you can edit and save, tap the button in the upper right corner of the screen.
The Green Screen Editor
The Green Screen Editor opens when you create a new project or load an existing one. This is where you’ll import videos and images, record videos using the live camera, and export your finished project to the photo library.
User Interface
There are four primary elements in the editor's main view:

- The Source Selector is where you'll add your image sources – the video camera, or a prerecorded video or photo from your photo library.
- The Preview shows the combined image sources at the current time on the timeline. This is how your image will look in the completed video.
- The Timeline shows how your image sources are arranged. Use it to scroll through your video and select an image source so that you can change its settings.
- The Toolbars are where you'll find the chroma, crop, and mask tools, the play and record buttons, and a few other controls and switches.
The user interface adapts to the size and orientation of the device you're using, so the toolbars may arranged differently than they are in the illustration above.
Adding, Selecting, and Removing Image Sources
The images for your green screen video can come from four types of sources: the live video camera, prerecorded video, photos, and artwork imported from **Animation & Drawing by Do Ink**. You may add an image source to any of three layers. Sources added to the top layer are shown in front of sources added to the middle layer, and sources added to the bottom later are shown in the background. To add a source, tap the  button on the desired layer and select your source: the camera, a video or image, or Do Ink artwork.Adding Videos and Images
You can import videos and images from your photo library, or from cloud-based services such as Dropbox or Google Drive.Videos and images are added to the selected layer at the current time on the timeline. Set the current time by scrolling the timeline horizontally. As you do, you'll see the time label on the toolbar change to show the current time. For example, if you want insert a video starting at the 3-second mark, simply scroll the timeline to 3 seconds and add your video there. By default, images are placed on the timeline with a duration of 5 seconds. After the image has been added, you can adjust its duration as described below. You can change the default duration for images in the user preferences panel, reached by tapping the  button *in the Gallery*.Initially, the app assumes that you'll want to import videos and images from your photo library. To import assets from another location, you may need to tap the "Location" button in the upper left corner of the import panel.
Note that the app does not make copies of imported videos and images. Rather, each project contains references to videos and images stored in your photo library. If the original videos and images are deleted or removed from your iPad for any reason, the app will lose access to them. You'll be alerted if there are missing videos and images when you open a saved project, but it's important to keep this feature in mind as you manage your photo library.
Adding the Camera
Add the camera to the timeline just as you'd add a video or image. Tap the  button on the desired layer and select the camera source. The camera is added to the selected layer at the current time on the timeline. When you add a camera source, any existing sources on the same layer that start at a later time are removed, so that the camera source can be active for an unlimited duration. Camera sources don't need to run forever, however. You can limit the camera source to a finite length of time in either of two ways – by using the "trim" tool (discussed below), or by adding another image source at a later start time on the camera's layer.Previous versions of the app limited you to a single camera source that occupied an entire layer on the timeline. Starting with version 2.0, you can now add multiple camera sources to the timeline, on different layers, and with different start times.
Adding Artwork from Animation & Drawing By Do Ink
You can add animations and drawings to your **Green Screen** project by importing artwork created with our other app, **Animation & Drawing by Do Ink**. You can create drawings, flipbook-style animations, and sophisticated animations using keyframes and motion paths. It features a full set of easy-to-use, yet powerful vector drawing tools and an extensive collection of reusable art "props". It's simple enough for doodlers, with advanced features for skilled artists and animators. To import artwork from **Animation & Drawing** into **Green Screen**, tap the "Do Ink" button on the source selector. You can import artwork from the Do Ink "shared folder", or from cloud-based services such as Dropbox or Google Drive. Your artwork will be placed on the selected layer at the current time on the timeline.Refer to the documentation in **Animation & Drawing** for more information about how to export artwork. If you have both Do Ink apps installed on your iPad, then the easiest way to import artwork into **Green Screen** is by saving it as data in the Do Ink shared folder. You can also import artwork from cloud-based storage, even if you don't have **Animation & Drawing** installed on your iPad.Transparent areas in the original artwork will also be transparent when the artwork is imported into Green Screen. For that reason, you will generally not need a chroma filter for Do Ink sources. The chroma filter is disabled by default for Do Ink sources, but you can enable it manually if necessary.
Selecting an Image Source
In order to change the settings for an image source (or to remove it), you'll need to select it first by tapping on the source in the timeline. When you tap on an image source to select it, the timeline will automatically scroll so that the selected source is under the red cursor line, and a red border is displayed around the selected source. Using the Source Tools
Tapping the *already-selected* layer on the timeline opens the **source tools** panel. To reiterate: tapping once on a timeline layer selects that layer, and then tapping a second time opens (or closes) the source tools panel. The source tools panel is where you'll go to:- delete image sources from the timeline
- cut, copy, and paste image sources
- trim an image source's duration on the timeline
- adjust the audio volume of prerecorded videos
Deleting an Image Source
You can remove the selected image source from the timeline by tapping the *Delete* button in the source tools panel.You can also remove *all* of the images sources on the timeline by tapping the  button on the toolbar.Open the source tools panel, if necessary, by tapping the already-selected layer on the timeline, as described above.
Copying and Pasting an Image Source
Use the *Cut*, *Copy*, and *Paste* buttons in the source tools panel to move and duplicate image sources on the timeline. This is particularly useful for moving an image source to a different layer on the timeline.Trimming an Image Source
Use the *Trim* button in the source tools panel to shorten the duration of the selected image source on the timeline. Select an image source, and scroll the timeline to the time at which you want the the image source to stop. Tap the *Trim* button to remove the portion of the image source on the right of the red cursor line. You can also trim image sources directly on the timeline, as described below; however, the trim tool is especially useful for one particular task: setting the duration of camera sources. When a camera source is added to the timeline, it is initially configured to run for an unlimited duration. The trim tool gives you an easy way to set a finite duration.Using the Timeline: Move and Trim
You can move image sources around on the timeline and trim their start and end times. To move an image source, tap and hold on it in the timeline. After holding for a moment, you'll be able to move the image source around on its timeline layer. Other image sources on the same layer will be moved, trimmed, or deleted to make room for the changes. You can also trim the start and end of image sources by dragging the square handles  at each end of the highlighted source in the timeline. This is particularly useful for trimming off unwanted portions of a video and for adjusting the duration of an image.Using the Chroma, Crop, and Mask Tools
Green Screen by Do Ink lets you combine images from multiple sources into a single image. The image sources are contained in layers, with images in the upper layers appearing in front of images in the lower layers. Normally, the image in the topmost layer would block the images below it. The trick is to make portions of the foreground images transparent, allowing the background images to show through. One way to achieve this has already been discussed: a **chroma key filter** erases portions of an image that match a particular color (such as green). That's how the classic "green screen" effect is created. In addition to chroma filtering, the app provides two additional tools that let you control which parts of an image are visible and which are transparent. To summarize: The chroma tool lets you specify a chroma key color. Portions of the image that match the specified color are erased.
 The crop tool lets you define a "cropping rectangle". Portions of the image that lie outside of the cropping rectangle are erased.
 The mask tool lets you use drawing tools to "paint" an arbitrary mask shape. Portions of the image covered by the mask shape are erased.
Using the Chroma Tool
The chroma tool removes (makes transparent) any portions of an image source that match a particular color. In the illustration below, the chroma color – green, in this case – is removed from the original image.  To use the chroma tool, select the desired image source by tapping it on the timeline, then tap the  button on the toolbar. The chroma filter is enabled by default for image sources in the top two layers, and disabled for sources in the bottom layer. Use the *Chroma* switch on the toolbar to enable or disable the chroma filter. Use the *Color* selector to set the **chroma key** – the color in the image that should be made transparent – and use the *Sensitivity* slider to specify how closely the source color needs to match the chroma key. You'll want to experiment with both the color and sensitivity settings to get the best results in your video.Using the Color Picker Tool
There's another – *really easy* – way to set the chroma key color. Touch anywhere in the preview image in the chroma tool and drag around in it. You'll notice that the chroma key color changes to match the color you're touching. So, for example, if you're setting up the chroma key filter for the camera, simply point it at your green screen and touch the preview image in the chroma tool. The correct color will be set automatically.Other Chroma Tool Features
Use a two-finger pinch gesture to magnify and reposition the preview image, enabling you to examine the effects of the chroma settings more closely. Tap the  button on the toolbar to reset the view to the original magnification and position. If the image source is a video or a Do Ink animation, tapping the  button on the toolbar shows a scrubber tool, which lets you see the effects of the chroma settings at any point in time. Tap the  button to show the toolbar again.Using the Crop Tool
The crop tool lets you specify an image source's cropping rectangle. The portion of the image source that lies *outside* of the cropping rectangle is hidden from view. You can specify a cropping rectangle for any type of image source, including the live camera, videos, photos, and Do Ink artwork.  To use the crop tool, select the desired image source by tapping it on the timeline, then tap the  button in the Settings Panel. Drag the corners of the yellow box to adjust the cropping rectangle, or drag anywhere else to move the entire rectangle without changing its size. Tap the  to reset the crop rectangle so that it includes the entire image.Other Crop Tool Features
Use a two-finger pinch gesture to magnify and reposition the source image inside the view, enabling you to adjust the cropping rectangle more precisely. Tap the  button on the toolbar to reset the view to the original magnification and position. Enable the *Constrain* switch on the toolbar to constrain the cropping rectangle so that it matches the aspect ratio of your project. This makes it easy to select a region of the source image that fits perfectly inside the project view. For videos and Do Ink animations, use the scrubber at the bottom of the crop tool to see how your cropping rectangle will affect the image at any point in time.Using the Mask Tool
The mask tool lets you use drawing tools to create an arbitrary mask shape. The portion of the image source that lies under the mask shape is made transparent. To use the mask tool, select the desired image source by tapping it on the timeline, then tap the  button. There are five drawing tools used to create the mask:You can create a mask for any type of image source, but keep in mind that the mask shape will stay the same over the entire duration of the source.
 The magic wand tool works like the "paint bucket" tool in a typical drawing app, except that instead of filling an area with color, it makes a region of the image transparent. To use the magic wand tool, select it on the toolbar, then tap on a location in the image that you want to erase. The tool uses the color of the image at the tapped location as a "seed", and erases any adjacent pixels that have a similar color. You can control how closely the colors need to match using the "Sensitivity" slider on the toolbar. The sensitivity control even works even after you've tapped on the image, so you can adjust the effect until you're happy with the results.
 The eraser tool lets you erase an arbitrary region of the image by dragging across the area you want to hide. You can control the size and opacity of the erase using the sliders on the toolbar.
 The rectangle tool erases a rectangular region of the image. Tap at one corner of the rectangle and drag diagonally across to the opposite corner. Control the opacity using the slider on the toolbar.
 The ellipse tool erases an elliptical region of the image. Drag from one corner of the ellipse's bounding rectangle to the diagonally opposite corner. Control the opacity using the slider on the toolbar.
 The paint tool restores the original image to regions of the image that were previously erased. You can think of it as an "unerase" tool – the opposite of the eraser. When you drag across the image, the original images is "painted" back onto the canvas. You can control the size and opacity of the brush with the sliders on the toolbar.
Other Mask Tool Features
Use a two-finger pinch gesture to magnify and reposition the source image inside the view, enabling you to zoom in on the image for more precise drawing. Tap the  button to reset the view to the original magnification and position. If you make a mistake, you can undo drawing operations with the  button, and redo them with the  button. Tapping the  button clears the mask (making the entire image visible). Tapping the  button inverts the mask, erasing the currently visible regions and restoring any currently transparent regions. For videos and Do Ink animations, the scrubber tool lets you see how your mask will affect the image at any point in time. Tap the  button on the toolbar to use the scrubber, then tap the  button to return to the mask tools when you're done.Using the Transform Tool: Pan, Scale, and Rotate
The transform tool lets you adjust an image source's position, size, and orientation. Using the tool couldn't be easier:- Select the desired image source by tapping it on the timeline.
- Position (pan) the image source by dragging it to the desired location in the (large) preview view. You can perform this operation with one or two fingers.
- Resize (scale) the image source using a two-finger pinch gesture in the preview view.
- Rotate the image source with a two-finger "rotate" gesture – i.e., place two fingers in the preview view and twist them around each other.
- Reset the selected image source to its original state by double-tapping anywhere in the preview view.
Using the transform tool with two fingers lets you pan, scale, and rotate the image source all at the same time. Drag to position the image, move your fingers closer together or farther apart to scale, and twist them around each other to rotate.
Audio Controls
When you add a video source to the timeline, use the **audio level** slider in the selected source tools to adjust its volume. Tap the already-selected layer to show the source tools, as described above. In the source tools panel, tap the  button to show the audio level slider. Setting the audio level to 100% maximizes the video segment's volume, and setting it to 0 mutes it completely. The audio level slider is disabled for videos that don't contain an audio track.When you record a video using the camera, the audio is captured at full volume. You'll have an opportunity to balance the camera audio with the audio tracks from any prerecorded video segments when you preview your finished video.
Camera Controls
You can capture video using either the front or back camera. To set the camera position, open the project settings panel by tapping the  on the toolbar. Use the *Camera Position* selector to choose the front or back camera.Normally, the camera automatically adjusts its focus, exposure, and white balance settings to produce the best possible image, but there are a couple of ways you can control the settings manually.If you have multiple camera sources on the timeline, they all use the same position setting – you can't use both the front and back cameras in a project.
- To set the focus and exposure point manually, select the camera source on the timeline, then tap in the large preview view. You'll see a yellow square appear where you tap. The camera adjusts the focus, exposure, and white balance automatically to optimize the image at the selected location.
Note that the camera will reset the focus and exposure point to the center if the image changes significantly at the selected location.
- To lock the focus and exposure settings, press and hold in the preview view. After adjusting the focus and exposure at the selected location, the camera locks the settings so that they won't change. You'll see a label at the top of the image when the camera settings are locked. To unlock the settings, tap in the preview view.
Video Resolution and Aspect Ratio
The app supports two high definition (HD) video formats: 1080p, with a resolution of 1920 by 1080 pixels, and 720p, with a resolution of 1280 by 720 pixels. Both of these formats use a "wide screen" 16-to-9 aspect ratio. In addition, the app supports standard definition video with a resolution of 640 by 480 pixels, for a 4-to-3 aspect ratio.To select the aspect ratio for your project, tap the  button *in the Editor* and select your desired option using the *Aspect Ratio* selector. By default, the app sets up new projects with 720p HD video. You can change the default setting using the app preferences panel, reached by tapping the  button *in the Gallery*.Note that some older-model devices don't support HD video on their front-facing cameras. In this case, the app records the video at a lower resolution and scales it up (meaning that these videos will not be true HD resolution).
Saving a Video to the Photo Library
How the app exports a video to the photo library depends on whether your project uses the live video camera or not.Recording with the Live Video Camera
Before recording your video, you may want to tap the  button to rehearse your performance and make sure everything in your project is set up the way you want it. Once everything is ready to go, tap the  button to record your video. You'll see a 5-second countdown clock before recording starts, so that you can be prepared to start. Recording will stop automatically at the end of the last image source on the timeline. You can use the trim tool to set the end time of your camera source, as described above. Alternatively, you can tap the stop button on the toolbar to end the recording manually. When you've finished recording, a preview view will open. The preview view lets you play your video, adjust the audio mix between the live audio recording and prerecorded videos, and save your video to the photo library.Saving a Video That Doesn't Use the Live Camera
Even when your project doesn't use the live camera, the app needs to "compose" the various image sources together into a single video, which can then be saved to the photo library. To do that, tap the  button on the timeline. You'll see a progress bar as your project is composed into a video. When the app has finished creating the video, the preview view will open, enabling you to play the video and save it to the photo library.Capturing Still Images
Tap the  button on the toolbar to select image capture. You can capture still images at any point along the timeline, with or without the camera. Simply scroll the timeline to the time at which you want to capture an image. If you're using the camera in your project, tap the  button to snap a photo. If you aren't using the camera, tap the  button to capture a still image from your project. Captured images are automatically saved to the photo library.The captured image will be the same as what you see in the preview view, with the same aspect ratio and composition. The resolution of the captured image is determined by the resolutions of the images sources on the timeline. In general, the app scales higher-resolution image sources down to match lower-resolution sources; however, it will create the highest-resolution image possible consistent with that policy.
Title and Tags
To edit a project's title and tags, tap the  button on the toolbar of the Editor. The project's tags and title are shown in the Gallery, and you can use the search bar to find tagged projects.Exporting and Importing Project Files
You can export your projects to cloud-based services such as Dropbox and Google Drive, and import projects (your own, or made by someone else) into the app.Exporting a Project
To export a project:- In the Gallery, locate the project that you want to export.
- Tap the action button (or swipe left in the card), then tap the Export button.
- The app creates a default file name based on the clip's title. If you'd like to change the file name, tap on it and edit it as desired. Do not include the "doink-gs" file extension in your file name – the app does that for you automatically.
- Select the cloud-based service (e.g., Dropbox or Google Drive) where you want to save your project and follow any instructions that are specific to that destination. In most cases, you'll need to tap a "Save" button in order to start the export operation.
All of the project's assets – images and videos – are bundled together into a single file. The size of the project file will be (approximately) equal to the sum total of the file sizes of the individual assets. Be aware that projects that use a lot of images and videos – especially long videos – can be quite large.
Importing a Project
To import a project file:
- Tap the button in the upper right corner of the Gallery, and select "Import a Project".
- Select the cloud-based service (e.g., Dropbox or Google Drive) where the project is located.
- Follow any instructions that are specific to that service. In most cases, you'll simply tap on the project file to download it to your device.
IMPORTANT: Green Screen project files are saved with a "doink-gs" file extension. This is the only type of file that can be imported into the app using this tool. If you mistakenly try to import a different type of file, such as an image or video, an error will result.
Getting Good Results
You can make a decent green screen video under less than ideal conditions, and you can make a really great video by taking a few extra steps:
- The quality and color of the backdrop you use makes a difference. Although you can record your video in front of any solid-color backdrop, the quality of the results can be improved if your backdrop is a bright, fully saturated color and if it's made from a matte, non-reflective material. You can find an inexpensive green muslin backdrop online by searching for a "green screen backdrop".
- Good lighting helps. You don't need special "movie lights", but you'll find that your results improve when your backdrop and subject are well lit. Minimizing shadows on your backdrop can also help considerably.
- Make sure that objects in your video (including people and clothing) aren't similar in color to your backdrop – otherwise, they'll be transparent!
- Consider mounting your iPad on a tripod or stand. Holding your camera still while recording in front of a green screen can improve the quality of your video.
- Experiment with the chroma key color and sensitivity settings. Getting them right makes a big difference.
Got a useful tip for making a great green screen video? Let us know about it at moc.kniod@troppus.
Oh, and one more thing...
Recording videos in front of a green screen isn't the only thing you can do with this app. Did you notice the animated background and characters in the tutorial video? They were made with our other iPad app, Animation & Drawing by Do Ink.

With Animation & Drawing by Do Ink, you can create drawings, flipbook-style animations, and sophisticated animations using keyframes and motion paths. It features a full set of easy-to-use, yet powerful vector drawing tools and an extensive collection of reusable art "props". It's simple enough for doodlers, with advanced features for skilled artists and animators.
What's more, it's great for adding graphics and animation to your green screen videos. Use Animation & Drawing by Do Ink to create your artwork, then import it into Green Screen by Do Ink as described previously. It's a great way to make artistic backgrounds or add animations to your green screen videos.
Check out Animation & Drawing by Do Ink in the App Store! Here's a convenient link to help you find it:
Contact Us
Please email your questions, suggestions, comments, constructive criticism, and bug reports to moc.kniod@troppus. And let us know what you're using Green Screen by Do Ink to make. We'd love to hear from you!